PT100 Temperature Sensor Interface
- Useful Electronics
- Apr 13, 2023
- 2 min read

PT100 temperature sensors are the most common type of platinum resistance thermometer. Often resistance thermometers are generally called Pt100 sensors, even though in reality they may not be the RTD Pt100 type. Pt refers to that the sensor is made from Platinum (Pt). 100 refers to that at 0°C the sensor has a resistance of 100 ohms (Ω).
To read temperature using PT100 sensor with ESP32 using ESP-IDF framework, you will need to follow these steps:
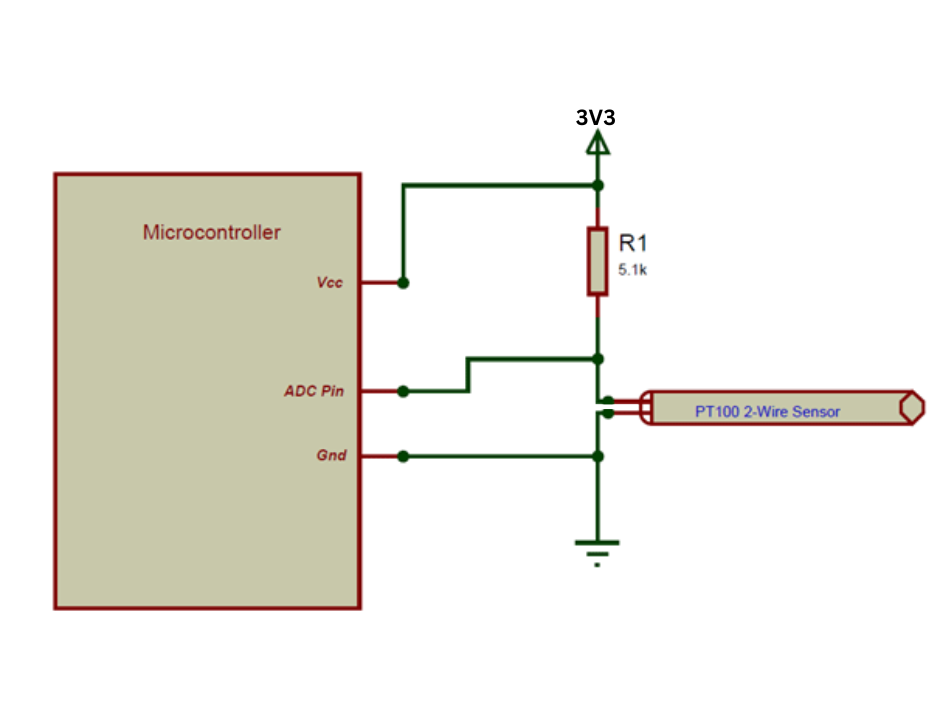
Connect the PT100 sensor to the ESP32 using an appropriate circuit as per the sensor's data sheet.
Include the required header files for the ESP-IDF framework in your code.
Define the ADC channel for the ESP32 to which the PT100 sensor is connected.
Initialize the ADC and configure it for reading the analog voltage values from the PT100 sensor.
Read the voltage values from the ADC and convert them to temperature values using the PT100 sensor's data sheet.
Of course similar steps should be followed when using some other MCU.
Here is a sample code for ESP32 MCU using ESP-IDF:
#include "esp_adc_cal.h"
#include "esp_log.h"

#define PT100_ADC_CHANNEL 4   // ADC Channel to which the PT100 sensor is connected

void app_main()
{
    esp_adc_cal_characteristics_t adc_chars;
    // Configure the ADC1 for 12 bit resolution
    adc1_config_width(ADC_WIDTH_BIT_12);
    // Attenuation to prevent overvoltage
    adc1_config_channel_atten(PT100_ADC_CHANNEL, ADC_ATTEN_DB_11);
    // Calibration of ADC
    esp_adc_cal_get_characteristics(V_REF, ADC_ATTEN_DB_11,         ADC_WIDTH_BIT_12, &adc_chars);

    while (1)
    {
        // Read raw ADC value
        uint32_t adc_reading = adc1_get_raw(PT100_ADC_CHANNEL);
        // Convert raw value to voltage
        uint32_t millivolts = esp_adc_cal_raw_to_voltage(adc_reading,     &adc_chars);
        // Convert voltage to temperature using PT100 data sheet
        float temp = (millivolts - 200) / 1.6;
        ESP_LOGI("PT100", "Temperature: %f", temp);
        // Delay for 1 second
        vTaskDelay(pdMS_TO_TICKS(1000));
    }
}
In this code, we have used the esp_adc_cal library to calibrate the ADC and convert the raw ADC values to millivolts. We have also used the ESP_LOGI function to print the temperature value to the console. Finally, we have used the vTaskDelay function to delay the task execution by one second.
Note: You will need to modify this code according to the PT100 sensor's data sheet and the circuit you are using to connect the PT100 sensor to the ESP32.
In this circuit, the PT100 sensor is connected in series with one 1k ohm resistors to create a voltage divider. The center point of the voltage divider is connected to the ADC pin of the ESP32. The 1k ohm resistors help to limit the voltage range to 0-3.3V, which is the maximum input voltage for the ESP32 ADC pins.
Note: This is just an example circuit, and you may need to adjust the resistor values and connections based on your specific PT100 sensor's data sheet and the ESP32 module you are using.
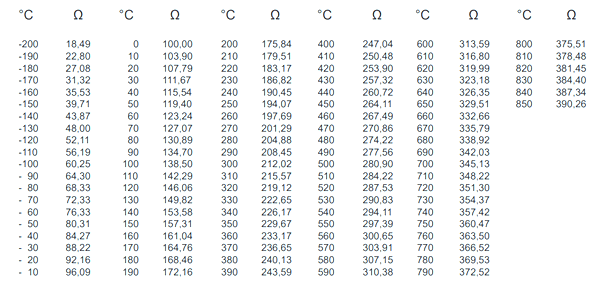
Here is an example how the resistance of PT100 changes with temperature:

For more tutorials visit Useful Electronics YouTube channel:
Comments